Monday, June 24, 2013

Dehydrating Curly Dock, Plantain and Watercress

My recent foraging trip: Curly Dock Seeds, English Plantain, Curly Dock Leaves and Yucca Flowers.

I have a secret.  I am not very good with fresh vegetables.  They have a tendency to rot in my fridge.  I will put them in the vegetable drawer with great expectations and two weeks later I rediscover them only to end up in my compost bin.  You would think someone interested in foraging and plants would be on top of this but, alas, it is not so.  I have, however, discovered a way that I can easily preserve my greens and use them on a regular basis.  While I do poorly at sauteing them when they are fresh, I am great at throwing a handful into spaghetti, chili or a crockpot of beans.  Even my kids will eat them then.

If you have a dehydrator, then you should follow the directions of the dehydrator.  I do not have one.  I use my oven.  Fortunately, it has a convection option which makes it easier, but you can also do it with bake though it may take longer.  First, I pick, wash and cut up the greens.

Curly Dock leaves ready for dehydrating.

I then put them on a metal pizza pan that has small holes in it.  I recently purchased mesh pizza pans on eBay that I think will work even better.


Turn your oven on to convection at 130 degrees.  It takes between 3 to 4 hours for me to completely dehydrate greens.  You should mix them up every hour.


Store in a jar and toss a handful into whatever you are cooking to add nutrition and a bit of flavor.  I have found that greens lose some of their really strong flavors when you dehydrate them.  I personally like that as it is easier to put into recipes.  Also, if you are working with greens that are stringy, like plantain, it no longer is an issue once dehydrated.  The leaves easily crumble.  Remember to check the bottom of your oven after dehydrating for any stray dehydrated greens.  It makes an unpleasant odor when you use it to cook with next.  Guess how I know?


You can dehydrate most greens in this way.  Curly Dock seeds should be destemmed and and rinsed in several changes of water and drained.  I do not take the husk off of the seeds.  Layer them on your pan and placed in a 170 degree oven until completely dried.  Mix them up every hour or so.  Once dried, I have found that a blender works the best to grind up for use in baked goods.  However, certain grain mills would probably work better.  My hand crank grain mill would have taken me all day to grind a few cups. I also tried my food processor which did basically nothing.  In my experience, you can add two tablespoons of ground curly dock seed into most bread recipes without changing the flavor much and you add nutrition and fiber.  There are recipes that use Curly Dock flour as a primary ingredient which I will share later.

Adding dried watercress to pasta sauce. Yumm.

Sunday, June 16, 2013

Foraging Around Franklin, Tennessee!

While the kids have been in day camp this week, I have had the opportunity to explore my area to look for new foraging spots.  It is amazing that I have lived here nearly ten years but have never really looked at my surroundings.  You can find so many new things when you really look around you.  I can't wait until everything is in season and ready to be picked!

Wild Grapes at Publix!

Elderberry Blooms at an overgrown empty business lot.

Mullein beginning to flower on Royal Oaks Blvd.

Burdock at Harlinsdale Park.
Staghorn Sumac grove on Mallory Lane.

There are four different spots in Franklin that you can pick wild blackberries!


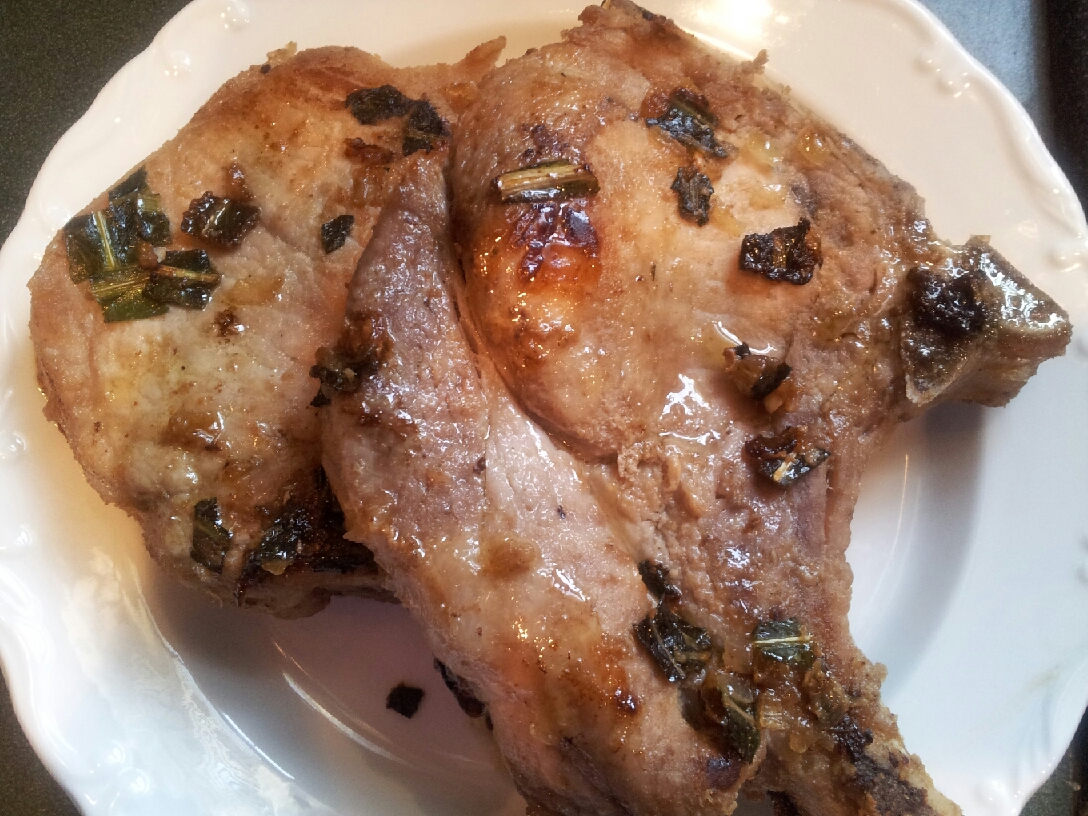
Pork Chops with Caramelized Onion and Thistle

Thistle is growing abundantly around here, and since every part of it is edible, I wanted to experiment more.  My first attempt, Lemon Thistle Martini, was certainly a winner in my book.  The stems of the plant, once the prickles are removed, actually are similar to celery though the taste is more bland which is not unpleasant but crisp and clean.  It is really easy to remove the prickles with a glove and sharp knife.  Younger plants will have a more tender stem and that is what you should seek.  It can be used in salads or any way that you would use celery.

Scraping the Prickly Outer Layer Off the Stems

Thistle Stems

The leaves can also be used once the prickly edges are removed.  My leaves were not very large so the final result was mostly the central stem.


The final result of cleaning the leaves of their sharp edges:


Pork Chops with Caramelized Onion and Thistle

The flavor of thistle leaves reminds me of turnip greens, but sturdier.

Ingredients:

6 pork chops
butter
1 small onion, chopped
1 cup chopped thistle leaves with prickles removed
garlic salt

Directions:

In a large frying pan, melt enough butter to fry the pork chops.  Add the pork chops.  In between the pork chops add the onion and thistle.  Sprinkle with garlic salt.  Fry until pork chops are browned and onion and thistle is caramelized.


I would definitely make this again.  The flavor was great!  However, the work involved in preparing the thistle leaves was too cumbersome for the meager amount that it produced.  A couple of nice things about thistle that I do like are that it is easy to identify and prolific in this area.  You would not starve if you are willing to put in the work!

Wednesday, June 12, 2013

Wild Food at Whole Foods!

I wanted to share these pictures I took at Whole Foods today in Franklin, TN.  It is amazing that you can pick both of these practically outside the door of the store.  Apparently they had to get them from California and Georgia.  I suspect the local wild variety has much less pesticides and is probably better for you.  Oh, and don't forget, free!


Friday, June 7, 2013

Lemon Thistle Martini


Every year about this time I see thistle taking over parks and empty lots all over my area.  I have always liked this plant because I find it to be beautiful.  Occasionally I would stop and carefully pick a bouquet as a centerpiece for my table, and until now, that has been the only reasonable use.

In my treasure hunt to find local, edible and natural food sources, I discovered that yes, thistle is edible but it is not for the veggie wimp.  You will need something like these:


Gloves were a present from my lovely husband!  They are thicker than regular rubber gloves.

Historically, thistle has been used to treat liver, kidney and gall bladder problems. It helps to protect the liver from damage and improve some symptoms of hepatitis. Research has also suggested that it has anti-cancer effects by reducing the blood supply to tumors and preventing cancer cells from dividing and reproducing. 

It originated in the Mediterranean region and likes dry sunny areas. In middle Tennessee it seems to grow everywhere.  All parts of the plant are edible though the seeds are generally what are used in current times.  The leaves can be trimmed of their prickles and used as a spinach substitute.  In the past these were commonly used in salads, soups and pies.  The seeds can be roasted and used in a coffee fashion once ground. The mid rib of the larger leaves can also be cut out and used in recipes.

So far, here is my favorite recipe for thistle!  This makes a very vibrant green drink.  My super picky kids liked the juice (before Vodka, of course)!

Lemon Thistle Martini


Ingredients:

10 small thistle leaves or 5 large leaves
4 cups cold water
1 green apple sliced with seeds removed
4 T sugar
2 lemons sliced, seeds mostly removed
Vodka

Directions:

Add ingredients except Vodka to blender and blend well.  It is optional to remove the skin of the lemons.  If you prefer less tart, then remove before blending.


Strain out the pulp. 

Cool color, huh? I strained the bulk out first and then strained again.


In a martini glass, add a shot of Vodka and ice (or chill with a shaker).  Fill with mixture.  Enjoy!


Other potential recipes worth trying:

Buttered Sow-Thistle
Stir-fried Sow-Thistle and Pork
Braised Thistle Stem
Sweet Chilli Thistles
Thistle Stroganoff

Friday, May 31, 2013

Totally Awesome Mulberry Cobbler!


Two weeks ago I was out at my favorite foraging haunt when I discovered these beauties!  They were not quite ripe yet then but yesterday about a third were perfect.  I had never picked mulberries before.  I started by plucking the berries off of the limbs.  The wind was blowing strongly, and I thought that the "just shake the branch" technique which I had read about would not work.  It was slow going, and I was ready to try something else.  I grabbed a branch and gently shook.  It rained mulberries!  I got out my old sheet and spread it out.  Just so you know, mulberries will stain anything they land on.  After about 15 minutes of shaking and moving around the tree, I had about two pounds of perfect fresh mulberries.

Raining Mulberries
Contrary to the children's song, Mulberries are trees and not bushes. The berries are actually not berries but clusters of fruit like grapes that are fused together.  There are no hard seeds in them like other similar looking berries.  Apparently to those who enjoy the fruit, every Mulberry tree is slightly different.  I visited another tree in Nashville several days ago and the berries were hard, sharp and white, not at all like these but still in the same family.  Some people dislike mulberries because of the sweet, low acidic and occasionally bland taste.  However, different trees have different flavors.  When you find one you like, you win the jackpot!  The tree I found has excellent flavor, sweet with a hint of tartness making it what I consider a fantastic find!
Mulberries will turn your fingers purple!

Herbalist claim that mulberries are cognitive enhancers that improve memory and vision. Mulberries have significantly high amounts of phenolic flavonoid phytochemicals called anthocyanins. These berries have shown to have potential health effects against cancer, aging and neurological diseases, inflammation, diabetes, and bacterial infections. Mulberries also contain resveratrol, another polyphenol flavonoid antioxidant, also found in grapes and supports heart health. They are also excellent sources of vitamin C and iron, among other vitamins.

Mulberries are often used for jams, jellies, wine, syrup, sauces and in a variety of desserts.  You can freeze, can or dry them.  I made cobbler with my mulberries and froze the rest while I wait for the wild crab apples to finish growing so I can make jelly.


It is optional whether you want to remove the small stem.  I eat them with the stem. It is soft and tasteless, at least right after you pick them!  If they will affect the presentation of the desert, recruit some kids to help as it is time consuming.  Cut stems off as close to the berry as possible.

Mulberry Cobbler Recipe

Ingredients:

1/3 cup butter
1 ½ cup all purpose flour
1/3 cup granulated sugar plus 2 tablespoons of sugar
1 cup milk
2 tsp baking powder
2 cups of mulberries (removing stem optional)

Directions:

Preheat oven to 325 degrees. Add the butter to baking pan and place in the preheated oven until butter is melted. In a separate bowl combine dry ingredients. Mix in milk until smooth. Pour mixture in to baking pan containing the butter and drizzle berries on top. Sprinkle with two tablespoons sugar. Bake 40-45 minutes or until golden brown. 

This is great served with vanilla ice cream.


Friday, May 24, 2013

Pineapple Weed Cheesecake!


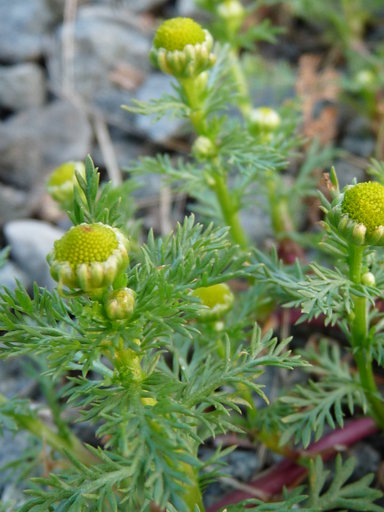
This plant is awesome!  Several weeks ago I was forcing taking my kids on a nature walk, when toward the end of our walk I spied this unusual plant growing in a gravely area.  I reached down and plucked it to take home and check out because I kind of remembered seeing it in one of my books.  I got a "Thank goodness she's not telling us about that one!" from the kid chorus.  Not yet, anyway...

By the time I got it to the car I had remembered that it could be pineapple weed and that if you crush the flowers it will smell like pineapple.  Sure enough, when I did it gave off a delectable aroma!  I got excited (I am such a nerd).

As it turns out, this is pineapple weed, Matricaria discoidea, a close cousin of chamomile with many of the same reported properties.  It is an annual plant native to North America and Northeast Asia.  It blooms from March until September.  It loves to grow in disturbed areas, especially those with poor, compacted soil.  Some avid gardeners report that it dies when transplanted to richer environments.  It resembles chamomile with the exception that the flowers have no petals, just the center head. It has small, pointed fern-like leaves.

It has traditionally been used medicinally as relief for gastrointestinal upset, fevers, infected sores, and postpartum anemia.  It's been reported to have a sedative, calming effect.  In folk medicine, it is sometimes utilized as a home remedy in the treatment of intestinal worms.  Also, the plant, when crushed and rubbed on skin, provides an effective, yet temporary and pleasant smelling insect repellent.

You can eat the plant raw or cooked.  It is frequently used as a tea, some even stating that it is better than its cousin the commonly used chamomile.  A word of caution, some people are allergic to this plant, so try carefully.  There are few plants that can be confused with this plant and none that smell like pineapple.

I returned to my new favorite pineapple weed picking spot and gathered a bouquet on which to experiment.  My car smelled incredible on the way home.  Some say this plant smells like pineapple (I agree), others say it has a more green apple smell.  Either way, it is truly amazing.  Just one plant is pleasant but a whole bunch is fantastic.

I made Pineapple Weed Cheesecake which even pleased my kids.  Here is the recipe if you would like to try!
Pineapple Weed Flower Heads Decapitated

Pineapple Weed Cheesecake

Ingredients:

Filling-
1 cup sugar
1/2 cup pineapple weed flower heads
2 cups boiling water
2 envelopes of unflavored gelatin (Knox)
4 (8 oz) packages of cream cheese, room temperature

Crust-
1 1/2 cup black walnut pieces, ground fine (or pecans)

Topping-
1 cup whipping cream
2 teaspoons sugar
1 teaspoon vanilla

Pineapple weed flower heads for garnish

Directions:

Place the sugar and water in a saucepan and bring to a boil, stirring to dissolve the sugar. Remove from the heat and add the pineapple weed. Cover the pan and leave to infuse for 30 minutes.


Meanwhile, in a large mixing bowl, whip the cream cheese until smooth.


Strain pineapple weed mixture through muslin, coffee filter or a fine sieve. Return strained mixture to the saucepan over low heat.  Add the gelatin and mix until dissolved, about 5 minutes.

I strained twice, once through a sieve and then through a coffee filter and sieve.
Using mixer, slowly add the gelatin mixture to the cream cheese until completely blended.

Then in a separate small bowl, whip the cream, sugar, and vanilla just until it is stiff enough that pulling the beater out leaves a hole that does not fill in. 


Place 2 tablespoons of ground nuts in the bottom of your individual serving dishes (preferably clear), and tamp it down with your fingertips.


Carefully spoon or poor in the cream cheese mixture, then drop two dollops of the whipped cream on the top. Garnish with one or two pineapple weed flower head.

Refrigerate until firm, about four hours.

This makes six half glasses or more if you use smaller dishes.


Other recipes that are great to try:

Pineapple Weed Tea

Ingredients:

2 teaspoons of flower heads, or one whole small plant
1 cup hot water
honey

Directions:

Steep flower heads in hot water for 10 minutes. Strain. Add honey to taste.


Also check out Pineapple Weed Sugar by Wildness.  This looks amazing.