Friday, January 17, 2014

Kudzu Bread!

Kudzu Bread

Often I lament that many of the frequently talked about wild edibles do not grow in Middle Tennessee or grow in puny amounts.  One example is when foragers wax on poetically about cattails and their many uses. We have a few in our area but even if I just harvest a couple it would deplete the sporadic population too much.  Imagine my surprise when we traveled to Michigan last summer and we passed fields of cattails.  I finally understood the fascination with this particular wild edible!  One of the wild edibles I am happy to enjoy here in the South that is not common in the North is the Kudzu plant.  As any southerner knows it is a wildly prolific plant.  It has become one of my favorites.

When it was blooming last summer I used the flower (that smells like grape cool-aid) to make Kudzu Jelly.  It won an award at our county fair.  At that time I also picked many of the leaves and dehydrated them for future use. The leaves are particularly good for dehydrating. They crumble well and stay a bright green.  Because Kudzu is in the legume family the flavor reminds you of green beans.  It is actually very mild, even more so than spinach.  I often add a handful of dried Kudzu to spaghetti sauce, soup or beans.  It is a great way to give a little color and nutrients to your dishes with out changing the flavor.  You can even add it to your bread!  Here is one of my favorite recipes.  It tastes like an artisan whole wheat bread.  Contrary to what you might imagine, it does not turn out green.  This recipe also uses dried ground Curly Dock seeds. It is a common plant in this area and at the end of summer you can easily forage pounds of it!

Kudzu Bread

Ingredients:

3/4 cup plus 1 tablespoon warm water
1 large egg
2 tablespoons vegetable oil
1/3 c sugar
3/4 teaspoon salt
2 3/4 c white flour
1/4 c dehydrated and finely crushed Kudzu
1/4 c ground dried Curly Dock seeds
2 1/2 teaspoons yeast

1 additional egg white for coating dough


Directions:

In a medium bowl, mix the Kudzu, Dock seeds and flour.  Premixing these ingredients before adding to the bread machine insures an even distribution.

Ground Dock Seed and Kudzu
In your bread maker, add all ingredients (except final egg white for coating) starting with the wet and finishing with the dry.  Set to dough cycle.


When the cycle is complete, briefly turn your oven on just to warm and then turn off. Remove dough from machine and divide into three sections.  Roll out each section into a long strand.  Braid the three strands tucking the ends under. Put plastic wrap loosely over loaf and place in slightly warmed oven.  Allow to rise for 25-30 minutes.

Kudzu loaf before final rising

Remove from warmed oven.  Preheat oven to 340 degrees.  Paint loaf with egg white.  Place in oven and bake for 30 minutes.  If the top gets to desired color before the 30 minutes is finished, place aluminum foil lightly over loaf and continue to bake.


Finished Kudzu Bread with Elderberry Jelly
 
Note: If you are in need of a grinder for grinding small amounts, this is the grinder I use.  It is cheap and grinds to a fine state. I purchased mine at Tuesday Morning for $15.

Monday, January 6, 2014

Henbit, It's What's for Breakfast!


It's January in Tennessee and I wanted to see what was growing in my backyard.  This is a common weed found practically everywhere.  It's called Henbit, Lamium amplexicaule, and is in the mint family though it does not have a mint flavor.  It has square stems and heart shaped scalloped leaves that grow along the stem. It is often confused with Purple Dead Nettle (also edible). However, Purple Dead Nettle has triangle shaped leaves that grow in clumps on the stem rather than spread out like Henbit.  It does not have any poisonous look a likes and you can eat stems, leaves and flowers.  It has a very mild flavor.

Henbit, named such because of chickens' attraction to it, is high in iron, fiber and antioxidants.  You can eat Henbit raw or cooked.  Here are some great recipes!

Henbit Flapjacks 

Ingredients:

2 cups flour
4 T sugar
1 1/2 t salt
1 T baking powder
2 cups milk
3 T oil
2 eggs
1 cup diced Henbit (leaves, flowers and stems if not too woody)
Butter for frying

Directions:

Mix dry ingredients together.  Add liquid ingredients and mix.  Fold in Henbit.   Fry in butter.  Serve with your choice of topping such as honey, syrup or preserves.


Cannelloni Bean and Henbit Soup

Ingredients:

2 T olive oil
4 cloves garlic, peeled and chopped
1 onion, chopped
6 cups chicken or vegetable broth
1 can (15.5 oz) Cannelloni beans, drained and rinsed
1 cup small pasta
1 1/2 cups chopped Henbit
Salt and pepper to taste
Parmesan cheese (optional)

Directions:

Heat olive oil in stock pot. Add garlic and onion and fry until translucent, about 10 minutes.

Add broth and bring to a boil.  Add beans and pasta.  Boil until pasta is tender, about 8 to 10 minutes.  Add Henbit and cook several minutes until wilted.  Season with salt and pepper to taste.

Top with Parmesan cheese when serving. Makes about six servings.

Sunday, January 5, 2014

How to Cube a Pumpkin for Canning or Freezing


One of the challenges to using pumpkin or hard squashes for me has been the difficult feat of removing the outer skin.  The common approach has been to bake it in the skin and peel or scrape it out.  This is not great for canning or freezing for stews because it makes the results far too mushy.  Here is a way that allows for beautifully firm pumpkin:

1. Cut your pumpkin in half and scrape out the stingy guts and seeds. It does not have to be perfectly cleaned out.

2. Cut the two pieces in half twice more resulting in manageable pieces.

Jarrahdale Pumpkin, one of my favorites.  It has an amazing flavor and lasts forever.
3. Slice into inch thick slices. Cut slices into inch size cubes.

4. Slice the gut side off and then slice the skin side off. If the cube is still too large for your purposes (like if you are freezing it for stews and want a bite size), then slice it in half again.


5. Drop it into water with lemon added until you are ready to freeze or can.  If your pumpkin is older and the flesh has lost some firmness, putting it in water will rehydrate it, often making it firmer. You can either freeze or can at this point. To freeze, drain and put in freezer bags and freeze.  I add it to stews I make in the crockpot.  To can, drain and fill a quart jar with pumpkin. Some people precook their pumpkin by boiling for two minutes at this point but I do not.  I have done it both ways and it makes very little difference.  Not boiling makes the pumpkin tend to float a little more but that does not bother me and it is not worth the hassle to prevent.  Add clean boiling water to jars.  Pressure can quarts for 90 minutes at 11 lbs and pints for 55 minutes at 11 lbs.  I use the canned pumpkin for pumpkin bread or pumpkin brownies which my kids love.

To make pumpkin brownies, use one box brownie mix and one quart of pumpkin.  Drain pumpkin and mash with a fork, drain again any extra liquid that mashing releases. Mix with brownie mix and bake according to box directions.  It makes fudge type brownies that are far healthier. My kids beg for me to make these.

I use all types of pumpkin to can and freeze, even the carving pumpkins from Halloween. They all work and are tasty in recipes.


Monday, December 30, 2013

Canning Turkey Broth Using Holiday Leftovers

Ham and Potato Soup and Turkey Broth

Several years ago I would have tossed the leftover holiday turkey bones without a second thought. That was before I realized their true value! Making and canning broth not only saves you money but you get to control the flavor and nutrition.  I have discovered that it far surpasses the bland and weak store bought varieties.

Throughout November and December there are numerous opportunities to purchase cheap turkeys. So by the time Christmas is over, I have accumulated four carcasses in my freezer (sounds a little scary put like that).  I have also been saving end cuts of onions, leeks, garlic, peppers, etc. in a little freezer bag just for broth making purposes. Oh, and you remember all those great Halloween pumpkins?  After the holiday, I diced and canned most of them and chopped a few up to freeze. These make great additions.  I also recently picked some wild mustard which I included. Additionally, I added some dehydrated chives and Kudzu leaves.

Frozen turkey bones and added vegetables before water added.
It is a very simple process. Place the bones in your pot.  Add vegetables on hand (like carrots, onions, garlic, celery, etc). Add several tablespoons of vinegar to help release the calcium from the bones. I prefer balsamic vinegar for the flavor. Cover with water.  Bring to a boil and then reduce to simmer. Cook for at least four hours.  Stir occasionally.  Add salt to taste.

Simmering with added pumpkin, carrots, and greens.

Prepare your pressure canner and ready your jars and lids.  When ready to can, drain to remove solids. Some people prefer to refrigerate their broth over night so that they can skim any extra fat which gels on top and then reheat to can. I will skim whatever fat I see after cooking, but I do not worry so much about removing all fat.  Pour into your jars and wipe rim of jar with paper towel which you wet with water and vinegar to help remove oils. Place lids on finger tight.

Fill your pressure canner with your jars.  For pints, pc 20 minutes at 10 lbs, and for quarts pc 25 minutes at 10 lbs.

If you are making a large amount of broth at once like what I am doing, you may want to use some of it to make some soup with your holiday leftovers.  I recently purchased 20 lbs of potatoes for $4 which I used to make ham and potato soup with my leftover holiday smoked ham.  Here's a little secret about canning potatoes.  You do not need to precook them to can.  When you peel and dice them, drop them into a bowl of water with lemon juice and salt.  Soak.  Drain and refill at least two times.  This helps remove the starch so you do not end up with cloudy potatoes.  It is also something to do while making the broth.  I prefer this method because precooking and then pressure cooking make them too mushy in my opinion.


Holiday Ham and Potato Soup

Potatoes, pealed and diced
Ham, cubed
Carrots, skinned and cut
Butternut squash, peeled and diced
Broth

In a quart jar, layer potatoes until half full.  Add several tablespoons of diced ham. Fill remainder of jar with carrots and squash.  Pour in hot broth and wipe rim of jar with paper towel which you wet with water and vinegar to help remove oils. Place lids on finger tight.

Soup before pressure canning.

Fill your pressure canner with your jars.  For pints, pc 75 minutes at 10 lbs and for quarts, pc 90 minutes at 10 lbs.

To prepare, you can eat as is or add cream or cream of whatever soup to give it a creamier texture.

Enjoy!

Saturday, December 7, 2013

December Foraging in Franklin!

It is amazing the number of wild edible plants that are still thriving in December! Winters in Middle Tennessee are generally mild until January and February.  We have had several frosts already but some plants are still going strong.  In my garden, I can still pick Kale, Egyptian Onion, Sorrel, and Mustard greens, though only the Kale is still looking at its peak.  I grew Sorrel and Mustard (love both) this year just so that I could recognize it in nature.  However, I have found that the domesticated version often looks different than in the wild but frequently tastes the same.

Harlinsdale Park:


Motherwort
Motherwort (Leonurus cardiaca) is a herbaceous perennial plant in the mint family, Lamiaceae.  As with all plants in the mint family, this plant has a square stem.  Just fyi, if the world as we know it ends and you are currently on Prozac or some other mood altering drug, this is a plant that you need to know about.  It is a mild relaxing agent, improves mental outlook and reduces anxiety without putting you to sleep. It is also good for your heart.  You can dry the leaves and use in tea or make a tincture with them. The leaves are not that tasty so if you make a tea, add other leaves, like mint, to improve the taste.


Wild Mushroom
I am no expert on mushrooms and therefore I do not pick or eat wild ones.  However, they do exist at this time of year.  So if you are an expert, you can find them at Harlinsdale.  If you know what this one is (just out of curiosity), please leave a comment letting me know. This one was found surrounded by wild mustard.  There was also another type of wild mushroom attached to what appeared to be a dead or dying tree growing next to the bridge over the stream.


Mustard

Thriving young plant of wild mustard. You would never know it was December by looking at this plant.  Notice the deeply lobed lower leaves with large terminal segment and smaller lateral lobes.  The mustard I grow in my garden is frilly while this one is not.  However, the taste is the same, very distinct, almost like horseradish.  You can eat it just like you can eat the mustard purchased in the grocery store (Food Saver carries it).  It is especially good sauteed. You can also dehydrate it and add it to soup and stews.  Once cooked, the strong flavor is tempered.

Burdock

Burdock is a plant that grows for two years and then dies.  See the spiky parts above?  That is the skeleton of the second year plant and also the inspiration for Velcro.  Really.  The big leaf beneath is a first year plant and that is what you want.  Right now is the best time to collect the roots on the first year plant because when it grows next year the roots will be used up to grow the flower heads.  Just fyi, you can also buy Burdock root at Whole Foods just down the street, though it is a bit pricey!


Blackberry Leaves

Blackberry leaves.  While blackberry season is over, you can still find the leaves on some of the plants.  These can be used to make a great tea or as remedy for digestion problems.  They also contain vitamin C.


Watercress
One of my favorites, Watercress!  While not in the prime of its growth, it can still be found growing strong.  Watercress actually prefers the cold and now that all the other plants have died away, you can actually see it again in the stream. There are two different styles of watercress that grow in Franklin.  One is the traditional rounded leaf variety that you find at the Buckingham stream in Franklin and can also be purchased at Whole Foods (grown in California).  The other variety has more pointed leaves (which can be found here).  Both taste the same. 


Clover Leaves
Clover, in the pea family.  You can find this everywhere, and it is edible.  The flowers are tasty but not currently in season (red is better than white).  The leaves are not so yummy but if you are starving, they can become an acquired taste. They are also packed with a powerhouse of vitamins and protein.  Read Green Deane's post for more information. Some people can be allergic to this plant so it would be best if you figured that out before eating in abundance.

Notes: While the content of this blog has been tried/tested and the research diligently presented, I am not responsible for your use of it. Always try a little of the food first to test for allergies. Please do your own research. Discuss with your doctor before you use any herbal medications. 

Monday, November 18, 2013

Fall Foraging in Franklin!

These wild edibles were found in Williamson County, TN local parks at the end of October and beginning of November:

Harlinsdale Park:

I have been to this park many times but on this trip, the Curly Dock and English Plantain looked the healthiest that I have ever seen. 

Curly Dock
English Plantain
Perilla aka Shiso Skeletons.  Find these and you will find the plant next year.
These are Tartarian Honeysuckle berries.  They are everywhere and tempting to a new forager.  Do NOT eat them.  They are poisonous to humans! If you squeeze one, you will see that they are actually quite nasty.

Winstead Park:
 
Black Walnuts

Black Walnuts everywhere!
One of two bags of Black Walnuts collected.  I love the smell of these.
Cleaning Black Walnuts is a job.  I wore two pairs of gloves together and still managed to stain my hands.
Honey Locust Tree with pods and seeds.  Young green pods and seeds can be eaten raw or cooked.  They taste like raw peas. The young pods can also be dried and ground and used as a flour.  The beans in these pods above can be roasted and ground and used as coffee.  That would taste like bitter chocolate. They can also be soaked (several days as they are hard) and boiled and used like beans.
Juniper Berries are what is used to make gin.  They are also a popular flavoring for meat and many German dishes.
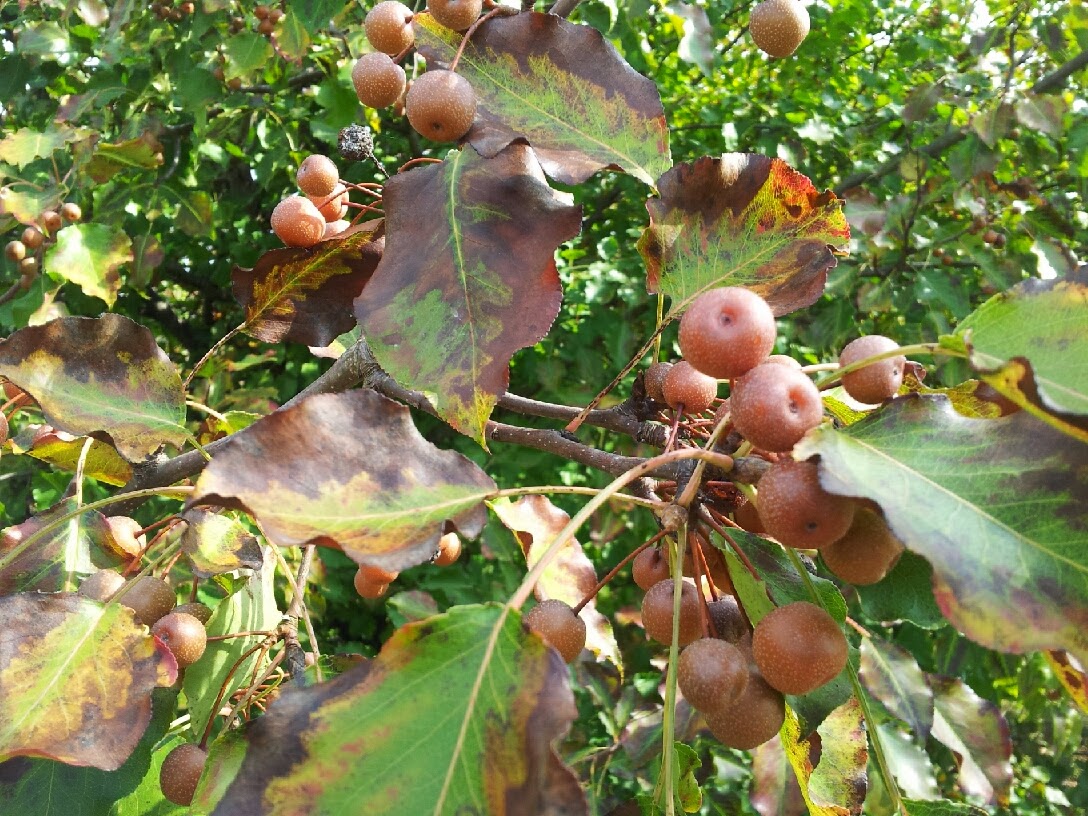
Wild Bradford Pear Fruit.  Yes, they are edible!

Bradford Pear Jelly


If you forage, it is always a good idea to take advantage of the plants that are the most abundant around you.  Bradford Pear trees would definitely fall into that category!  They are everywhere.  Homeowners both hate and love Bradford Pear trees. They are attractive, nicely shaped and resistant to most diseases. However the roots are shallow, the limbs are weak and a strong wind storm easily destroys older trees.

The root stock of the Bradford Pear, Pyrus calleryanna, was brought to the U.S. in 1910 from China. At that time the U.S. pear orchards were being threatened by a blight. Because this root stock was resistant, it was widely cloned.  Further experimentation on this root stock produced the Bradford Pear which was sterile, beautiful, and easy to reproduce which made it a commercial success. It had a built in genetic prevention to self-pollination. This worked great in the beginning when all Bradford Pears were from the same root stock.

As with any successful venture, competition was not long to follow. New cultivars of the Bradford Pear provided enough genetic variation that when cross pollination occurred, some trees produced edible, marble size fruit. This small fruit was then eaten by birds and the seeds transported to new locations. Thus, it has gone from being ornamental to being considered invasive.  The new variations are fertile and bear small edible fruit.

Because the tree is relatively new to the U.S. and probably not bearing fruit during the Great Depression, we do not have the benefit of old recipes that would best utilize the fruit. Most results from an Internet search would tell you that the fruit is inedible. That is not because it is poisonous, but because it has a tart pear flavor and the small size makes it unworthy of commercial usefulness, much like the Crab Apple. Actually, the most common cooking pears in North America are relatives of the Bradford.

If you look for recipes for the Bradford Pear, you will find a handful for making them into wine.  This is understandable because if you have ever tried the fruit, you will first notice the pear flavor and second the tart dryness which would make an excellent dry wine. If you are interested in trying a recipe for pear wine, HERE is a recipe.

My first attempt at using Bradford Pear fruit was to make jelly.  The final product is a beautiful color. It tastes like a pear sweet tart. It is pleasant, reminiscent of a dry white wine.  I think it would make a great glaze for a baked fruit tart or on a meat.  I added pectin to this recipe since it did not appear to have enough to make it gel as I was cooking it.  However, I suspect that if I had picked the pears earlier in the season (currently early November), the pectin in younger fruit may be enough to not use additional pectin.

Bradford Pear Jelly

Ingredients:

Plastic grocery bag of Bradford pear fruit
Stick of cinnamon
2 T lemon juice
Water
Sugar
Box of powdered pectin

Directions:

Clean the small pears by removing the stem. If you let them sit on your counter for at least a day, the stems dry out and are easier to just pull off. If you get a stubborn one, when you cut the fruit in half and it comes right out. Because it was late in the season, I had no problems pulling the stems off.

Put pears in a large pot. Fill pot with water to just above the fruit. Add stick of cinnamon.

Bring to a boil and reduce temperature to simmer. Cook until pears are mushy (about an hour). Using a potato masher or spoon, lightly mash the pears to help release the pectin and flavor.


Start your canner and water to boil if you plan to complete the jelly on the same day. Mine takes about an hour to get to a boil so now is a good time to turn it on.

At this point, you can drain your mixture using a jelly bag over night, however, I am too impatient for that. Start with a spaghetti strainer and strain the large part parts out of your mixture. Add the leftover fruit mush to your compost. Then move to a fine mesh strainer and strain juice twice. Finally, put coffee filters into your spaghetti strainer and then strain the juice. This takes about 10 minutes which is much easier than waiting overnight and works just as well.

Measure your juice. For every cup of juice, add a cup of sugar. Add two tablespoons of lemon juice. Bring to a boil, stir often. 

Pear juice with just added sugar and cinnamon stick.
In a separate bowl, mix your powdered pectin with about a half cup of water until powder is no longer lumpy.  Add to your boiling liquid.  Stir and bring back to hard boil.  Boil for an additional minute.  

Fill your jars with the hot liquid and boil in a water bath for 10 minutes.

Bradford Pear Jelly!