Friday, May 24, 2013

Pineapple Weed Cheesecake!


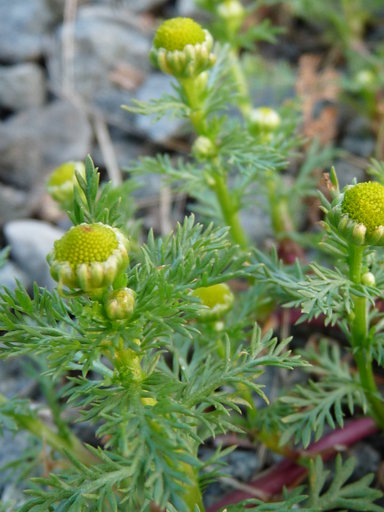
This plant is awesome!  Several weeks ago I was forcing taking my kids on a nature walk, when toward the end of our walk I spied this unusual plant growing in a gravely area.  I reached down and plucked it to take home and check out because I kind of remembered seeing it in one of my books.  I got a "Thank goodness she's not telling us about that one!" from the kid chorus.  Not yet, anyway...

By the time I got it to the car I had remembered that it could be pineapple weed and that if you crush the flowers it will smell like pineapple.  Sure enough, when I did it gave off a delectable aroma!  I got excited (I am such a nerd).

As it turns out, this is pineapple weed, Matricaria discoidea, a close cousin of chamomile with many of the same reported properties.  It is an annual plant native to North America and Northeast Asia.  It blooms from March until September.  It loves to grow in disturbed areas, especially those with poor, compacted soil.  Some avid gardeners report that it dies when transplanted to richer environments.  It resembles chamomile with the exception that the flowers have no petals, just the center head. It has small, pointed fern-like leaves.

It has traditionally been used medicinally as relief for gastrointestinal upset, fevers, infected sores, and postpartum anemia.  It's been reported to have a sedative, calming effect.  In folk medicine, it is sometimes utilized as a home remedy in the treatment of intestinal worms.  Also, the plant, when crushed and rubbed on skin, provides an effective, yet temporary and pleasant smelling insect repellent.

You can eat the plant raw or cooked.  It is frequently used as a tea, some even stating that it is better than its cousin the commonly used chamomile.  A word of caution, some people are allergic to this plant, so try carefully.  There are few plants that can be confused with this plant and none that smell like pineapple.

I returned to my new favorite pineapple weed picking spot and gathered a bouquet on which to experiment.  My car smelled incredible on the way home.  Some say this plant smells like pineapple (I agree), others say it has a more green apple smell.  Either way, it is truly amazing.  Just one plant is pleasant but a whole bunch is fantastic.

I made Pineapple Weed Cheesecake which even pleased my kids.  Here is the recipe if you would like to try!
Pineapple Weed Flower Heads Decapitated

Pineapple Weed Cheesecake

Ingredients:

Filling-
1 cup sugar
1/2 cup pineapple weed flower heads
2 cups boiling water
2 envelopes of unflavored gelatin (Knox)
4 (8 oz) packages of cream cheese, room temperature

Crust-
1 1/2 cup black walnut pieces, ground fine (or pecans)

Topping-
1 cup whipping cream
2 teaspoons sugar
1 teaspoon vanilla

Pineapple weed flower heads for garnish

Directions:

Place the sugar and water in a saucepan and bring to a boil, stirring to dissolve the sugar. Remove from the heat and add the pineapple weed. Cover the pan and leave to infuse for 30 minutes.


Meanwhile, in a large mixing bowl, whip the cream cheese until smooth.


Strain pineapple weed mixture through muslin, coffee filter or a fine sieve. Return strained mixture to the saucepan over low heat.  Add the gelatin and mix until dissolved, about 5 minutes.

I strained twice, once through a sieve and then through a coffee filter and sieve.
Using mixer, slowly add the gelatin mixture to the cream cheese until completely blended.

Then in a separate small bowl, whip the cream, sugar, and vanilla just until it is stiff enough that pulling the beater out leaves a hole that does not fill in. 


Place 2 tablespoons of ground nuts in the bottom of your individual serving dishes (preferably clear), and tamp it down with your fingertips.


Carefully spoon or poor in the cream cheese mixture, then drop two dollops of the whipped cream on the top. Garnish with one or two pineapple weed flower head.

Refrigerate until firm, about four hours.

This makes six half glasses or more if you use smaller dishes.


Other recipes that are great to try:

Pineapple Weed Tea

Ingredients:

2 teaspoons of flower heads, or one whole small plant
1 cup hot water
honey

Directions:

Steep flower heads in hot water for 10 minutes. Strain. Add honey to taste.


Also check out Pineapple Weed Sugar by Wildness.  This looks amazing.

Saturday, May 18, 2013

Great Reason to Forage - It Improves Your Brain!

Check out this study by researchers in Germany that shows exploring your environment improves your brain power!  As far as I am concerned exploring is one of the best parts of foraging, and the free, non-GMO food of course!

Thursday, May 16, 2013

Foraging Gold - Watercress!

Watercress
If you have researched much on foraging, you will frequently come across writers waxing poetically about the benefits and their love of the mild peppery taste of watercress.  It has been on my top five plants to find for forever.  I would always glance at any body of water looking for the telltale signs of green growth but never finding it...until now!  Recently I visited a local park that has an old farmhouse on the property which is being renovated.  Behind this totally cool house are various out buildings including an old log house which is falling in and a spring house in fairly good shape.  I suspect that the location of the house and log cabin was directly related to the spring available.  The area is partially fenced in so wild animals or stray cows would find it very difficult to access.
Log Cabin in Decline
Interior of Log Cabin - I put my phone through the wall and snapped a photo!

View of Spring House from Log Cabin.  Large farmhouse is to the left beyond trees.

The spring flows out of the spring house and down a canal built up on either side by stones.  This leads to the pond not far away where there are fish and you can often find people fishing.  The water from the spring is crystal clear.  Honestly, I had never seen watercress up close.  I've probably eaten it at restaurants but did not know what it was.  I've looked through upscale groceries for the rare offering but to no avail.  It does not last long after cutting so it is not mass produced.  There are also many versions of cress so it was necessary to research and find the one at which I was looking.

As it turns out, what I found was Rorippa nasturtium-aquaticum (Nasturtium officinale) from the Brassicaceae (mustard and cabbage) family. This family also includes broccoli, cabbage, brussels sprouts, cauliflower, kale, mustard greens, collard greens, bok choy and turnips. Watercress is a fast-growing, aquatic or semi-aquatic, perennial plant originally from Europe and Asia, and one of the oldest known leaf vegetables eaten by humans. It is a creeping, floating, hollow stemmed plant with leaf branches that contain three to five oval shaped small leaves.  In the spring it has small clusters of white four-petaled flowers.


I picked a few specimens to take home with me and put in a glass of water.  Within a day it had rooted, however, it prefers flowing water and will eventually wilt and die in a cup.  One method to keeping it fresh longer than a few days is to put it in water when you get it home.  I picked more and put in a bag into the refrigerator for a few days.   When I took it out it was still fairly firm but starting to lose its perk.  I plucked the leaves from the plants that I wanted to use and just as an experiment, I put the stems in water.  Within a couple of days, these too had rooted.  It is truly an amazing, resilient plant.  It particularly likes springs and will survive all winter long in them.  A spring is usually cooler in the summer and warmer than the environment in the winter.

What's so great about watercress?  It is a super food! It is packed with vitamins and minerals and actually tastes good. It has more calcium than milk, more vitamin C than oranges, and more iron than spinach. It was once known as scurvy grass as it prevented scurvy in sailors.  It has detoxifying qualities, lowers cholesterol and has been attributed in recent research to help prevent and fight cancer particularly of the throat, lungs (Hecht SS, Chung FL, Richie JP, et al., 1995) and breast (University of Southampton, 2010). Eating it daily can reduce the DNA damage to white blood cells which is a trigger in the creation of cancer (University of Ulster, 2007).

When there is good, there is bad... You have to be careful where you get it.  Being that it grows in water, it can take on the pollution in the water. Also, there is a chance that if watercress is downstream from a farm with animals, particularly sheep and cattle, it may contain the immature parasite larvae of Fasciola Hepatica, or the "common liver fluke."  It is a parasite that can cause liver damage to its hosts of which humans can number. You can also acquire this from raw or undercooked freshwater fish. According to the CDC, Fasciola infection is both treatable and preventable. This is why it is important to choose a stream without pollution and not near cattle or sheep.  Liver fluke infections in humans are uncommon in the United States, but they do occur, particularly among people who have traveled to parts of the world where these parasites are frequently found.

If your fears outweigh the potential benefits of watercress, fear not, there are ways to secure your plants.  You can wash your watercress with water and a 6% vinegar or potassium permanganate for 5-10 minutes which kills the potential problem.  Also, watercress, unlike common grass, is dicotyledon meaning that it grows from the tips and not the base.  Thus, if you pick your watercress above the waterline, you should be safe as the larvae can not climb.  Finally, cooking will kill it.  In fact, according to the University of Florida, the larvae on vegetation are quickly killed by summer's heat.  Use your found watercress in cooked dishes if you are unsure.

Here are some recipes to try:
Watercress after Cleaning
Watercress, Sage & Wild Garlic Grass Fococcia

Ingredients:

Dough:

1 cup water
1 tablespoon olive oil
Sage and Wild Garlic
3 cups flour
1 teaspoon salt
1 teaspoon sugar
1 teaspoon rapid-rise active dry yeast
1 tablespoon watercress, chopped fine

For the topping:

3 tablespoons olive oil
5 fresh sage leaves, diced
2 tablespoons watercress, chopped fine
1 tablespoon wild garlic, chopped (about three stalks)
1 teaspoon coarse sea salt

Directions:

Add the bread ingredients into your bread machine in the recommended order by the manufacturer.  Set to the dough cycle.   You can also mix and knead the ingredients manually if you prefer.

Once the cycle has ended, lightly grease a large cake pan or a pizza pan.  Remove the dough from the bread machine and roll out to fit your pan.  Cover with plastic wrap and allow to rise for 30 minutes.

Dough Before Baking
Preheat oven to 400 degrees F.  When the dough has finished rising, using your fingertips, poke the dough to make deep indentions on the surface.  Drizzle with olive oil.  Sprinkle with sage, watercress, wild garlic and sea salt. 

Bake for 20 to 25 minutes until golden. Serve hot.  Here is a photo of the final result:

Fococcia, Yumm!


Shepherd's Pie with Watercress

Ingredients:

2 bunches watercress, chopped and divided
2 tablespoon butter, divided
1 onion, chopped
1 stick celery, chopped
1 carrot, peeled and chopped
4 large potatoes, peeled and cubed
Salt and pepper to taste
1 cup shredded cheese, divided
1 pound lean ground beef
2 tablespoons all-purpose flour
3/4 cup beef broth
1 tablespoon Worcestershire sauce
1 tablespoon ketchup
1 teaspoon thyme leaves, chopped

Directions:

Preheat oven to 400 degrees F.

Bring a large pot of salted water to a boil. Add cubed potatoes and boil for about 15 minutes until tender but still firm. Drain and mash. Mix in 1 tablespoon butter, half of the chopped watercress, and half of the shredded cheese.  Season with salt and pepper to taste and set aside.

Meanwhile, in a large frying pan, add one tablespoon of butter, chopped onion, chopped carrots and chopped celery.  Fry mixture for 10 minutes until tender, remove from pan and set aside.

In same pan, add the ground beef and cook until browned.  Drain.  Stir in flour and cook for an additional minute.  Add vegetable mixture, the Worcestershire sauce, beef broth, ketchup and thyme. Stir and simmer for 10 to 15 minutes until reduced then stir in the other half of the chopped watercress.

In a large casserole dish, layer the ground beef mixture.  Add the layer of mashed potatoes.  Top with the remaining cheese.

Bake for 20 minutes, or until golden brown.


Loaded Potatoes with Cream Cheese, Watercress and Bacon

Ingredients:

4 large baking potatoes
8-10 slices bacon, fried crisp and crumbled
2 tablespoons sour cream
4 tablespoons butter, softened
1 (8 ounce) packages cream cheese, softened
1/3 cup watercress, chopped
1/2 teaspoon seasoning salt

Directions:

Preheat oven to 400 degrees F.

Scrub the potatoes, and prick several time with the tines of a fork. Place on a plate.

Microwave potatoes for 10 minutes, turning midway through cooking.

Cut in half lengthwise and scoop out flesh leaving some to preserve the potato shape.

Mash the scooped potatoes and mix with the remaining ingredients.

Fill back into skins and bake 20 minutes.


Watercress and Cauliflower Soup

Ingredients:

3 cups chicken broth
1 cup whole milk
1 small head cauliflower, cut into 1-in. florets
1 onion, coarsely chopped
1 tablespoon butter
1 bunch watercress, stems removed
Salt and pepper to taste

Directions:

In large saucepan melt butter over medium heat. Add onion and fry until soft and translucent, about 5 minutes with occasional stirring.  Add cauliflower, chicken stock, and milk. Bring to a boil. Cover and reduce heat. Simmer until cauliflower is very tender when pierced (about 15 minutes). Add watercress and cook for one minute more. Remove from heat.

Working in batches, add soup to food processor and purée.  Return soup to saucepan to keep warm and season to taste with salt and pepper.


Notes: While the content of this blog has been tried/tested and the research diligently presented, I am not responsible for your use of it. Always try a little of the food first to test for allergies. Please do your own research. Discuss with your doctor before you use any herbal medications.  

Shared With:  CreativeHomeAcre, FromTheFarm, TGIF, ThriftyThingsFriday, FarmFunFriday, LHITS, FidlinFridays, WeekendWhatever, CleverChicks, NaturalLivingMondaysMakeItYourself, HomesteadBarnHop.

Thursday, May 9, 2013

Black Locust Blossom Fritters! Yummmmm!

Black Locust Blossoms

It never fails.  Whenever I go out looking for one thing I stumble across something even better!  This past week I visited Harlinsdale Farm, a park in Williamson County, TN.  I went to check on the progress of the Curly Dock which is all over the fields and starting to produce seeds.  I waded through the waist high grasses and walked toward the river's edge.  I discovered that there was a mowed walking path along the river which I followed.  It lead up hill to a woodland hiking path bordered by what used to be farm fields.  Along the entrance to the hiking path were some beautiful white blooms hanging from three trees. I picked a few just because the scent was incredible.  An hour later I was flipping through my Peterson's Guide looking for another plant that I had come across, and there was the exact picture of the blooms that I had picked (this never happens).  I nibbled on one bloom to see if it tasted like what was described and it was!  They were so good that on my way to Target I kept reaching over to pluck a few more to eat.  Of course I stopped myself since I was not 100% sure of what I found.  I then went home and researched the plant and today I went back to study the tree and the leaves to confirm that what I had found was Black Locust Blossoms.  I must say, these are my favorite find so far!

The scent of these flowers are similar, in my opinion, to lilacs with a bit more of a vanilla side.  If you cross their path, it will stop you in your tracks to locate the origin of this most incredible smell.  The taste is similar to their smell.  It is slightly sweet with a fresh crisp texture.  I never thought I would enjoy eating flowers so much!  The blossoms are the only edible part of the tree.  My guide said that they made great fritters so I plucked a bag full and took them home!  Apparently they only bloom for about two weeks and then they are gone.  Today I could see about a quarter were already drooping with age, a quarter had yet to bloom and the rest were in perfect blossoms.  So now is the best time to get these!  Even my kids thought these were awesome, both raw and cooked.


The tree (Robinia pseudoacacia) has the rare quality of being a fast growing hard wood. It likes poor soil and disturbed areas. It is exceedingly drought tolerant. The wood is resistant to rot and extremely durable. It is actually one of the hardest and heaviest woods found in North America. It is estimated that the wood can last up to 500 years when exposed to wet conditions and 1,500 years in dry environments. It burns very hot and slowly with little smoke. The autumn color of the tree is a soft yellow.
  

If you are fortunate enough to locate this tree and blossoms, give this recipe a try!

Black Locust Blossom Fritters


Ingredients:

1 loose (not packed) gallon baggie of Black Locust Flower blooms with stem
2 cups flour
1 teaspoon salt
4 tablespoons sugar
4 level teaspoons baking powder
2 eggs
2 cups milk
juice of 1/2 lime
powdered sugar
oil for frying

Directions:

Place blooms in colander and gently rinse to remove any stray insects and dust. Shake and allow to drain for about 10 minutes.

Meanwhile, add oil to pan and heat to medium high.

In a mixing bowl, add dry ingredients and mix. Add milk, eggs and lime juice. Mix until well moistened. If the batter is thick, add a bit more milk.

Take the blossoms by the picked end stem and dredge through the batter mixture on both sides. Drop or place into the heated oil. Fry until both sides are a light brown. Lower temperature if they are browning too fast. Remove and put on plate with paper towel to drain.

Sprinkle with powdered sugar and serve hot.

More than feeds a hungry family of six!


Thursday, April 25, 2013

The Soft and Fuzzy Mullein

I love Mullein, partly because it is so easy to distinguish and partly because it is so soft to touch!  I was driving by an area near my house that had been cleared for office buildings that never occurred due to the sinking economy when out of the corner of my eye I saw a beautiful Mullein rosette growing.  This plant prefers to grow in disturbed, dry and sunny grounds.

It is not native to the United States.  Early European settlers brought the plant to the new world and introduced it to the native population which quickly took advantage of the many benefits.

Mullein is not used for food but is an important herb for medicine.  If you are interested in herbal remedies, this is a plant you should have in your garden.  It is primarily used for respiratory ailments.  It has been used as an effective treatment for asthma, whooping cough, bronchitis, hoarseness, pneumonia, earaches, colds, chills, flu, allergies, tonsillitis, and sore throat.  The herb produces an expectorant action which is attributed to the triterpenoid saponins present. Additionally, it contains tannins which help shrink inflamed and swollen respiratory passages, thus allowing for easier breathing.  Mullein also is rich in mucilaginous substances, called polysaccharides, which protect mucous membranes, preventing the membranes from absorbing toxins.  This produces a soothing and cooling effect to the lungs and throat.  It also has an antispasmodic effect, relaxing muscles and relieving chronic coughing.  It has even been an effective treatment for tuberculosis since it inhibits mycobacterium, the bacteria which causes the illness.  Indians smoked the dried leaves as a remedy for lung ailments.

Other uses for this plant include as a remedy for complications to Lyme disease, urinary incontinence, recurring bladder infections, interstitial cystitis and to treat spinal and muscle injuries. It also has a mild narcotic effect on some people and has been used as a sleep aid and to relieve abdominal cramping.

Stranger uses include as "wild" toilet paper or the placement or it inside of shoes to provide some comfort and warmth. However, small hairs can get stuck in your skin which is very uncomfortable. Native American tribes used it to make dyes and torches. It is highly flammable.

Mullein packs a powerhouse of vitamins and minerals. It is high in iron and is a good source of Vitamins A, B-complex, C, and D, as well as calcium, potassium, magnesium, silicon, manganese, and sulphur.


Mullein blooms from June to September.  It is a biennial plant meaning it takes at least two years before it flowers.  The first year it produces its rosette.  The rosette must be large enough to flower which is usually the following year but may rarely take up to four years.  It produces a prodigious amount of seeds (100,000 to 180,000).  The seeds generally fall near the parent plant as it has no dispersal system so you can find future plants near an old plant.  The skeletal remnants of an old plant are easy to distinguish.  Mullein seeds can last decades and still germinate.  Do not eat the seeds as they are considered toxic.  Native Americans would throw ground seeds in still water to paralyze the fish.  Really.  The seeds contain rotenone (not very toxic to humans) which is a fish poison that cause paralysis in fish and the fish will float to the surface of the water.  The blooms of the flowers do not occur all at once.  If you desire to pick the blooms for a recipe, you will have to make repeated trips to the plant to acquire enough blooms or find a very large patch of plants.

Here are some medicinal recipes:

Basic Mullein Tea

Ingredients:

1 - 2 teaspoons dried mullein flowers and leaves
1 cup boiling water
honey to taste

Directions:

Pour water over dried mullein flowers and leaves. Cover and steep for 10 - 15 minutes. Pour the liquid through a fine cloth or a coffee filter to strain out the plant's tiny hairs, which can irritate the throat. An alternative method is to place herbs in the center of a coffee filter and tie with plastic twist tie and then steep.  You can drink up to 3 cups of mullein tea daily. Sweeten the tea with honey, if desired.

Note:  You can use the basic tea without the honey as a steam to be breathed to improve lung function or in a nebulizer.

Cough Soothing Tea

Ingredients:

2 teaspoons dried mullein leaves
1 teaspoon dried Calendula flowers
3/4 teaspoon dried marsh-mallow (the plant)
1/2 teaspoon dried licorice root
1/2 lemon
1 teaspoon honey

Directions:

Cover herbs with one cup of boiling water and steep for 15 minutes. Strain tea with a fine cloth or a coffee filter, then add the juice of 1/2 lemon and 1 tablespoon honey. Drink two to three cups daily for cough relief.

Ear Ache Drops

Ingredients:

1/4 cup mullein fresh flower
3 garlic cloves
olive oil
small jar with lid

Directions: 

Chop the garlic into small pieces. Place fresh dry flowers in a blender or crush in a mortar and pestle. Place the garlic and mullein flowers in a small glass jar with a lid. Cover the mullein flowers with olive oil and allow to set in the sun for two weeks shaking daily, or heat over very low heat for 4 hours.

Strain the oil through cheesecloth and store your oil in a small dropper bottle in the refrigerator.

To use, warm the oil to body temperature and drop 2-3 drops in affected ear.  If a perforated eardrum is suspected (oozing from the ear), do not use and seek medical attention.  Can be used two or three times per day.

Note: Dried flowers can be used as well.

Asthma Blend Tea

Ingredients:

2 teaspoons dried mullein leaves
1/2 teaspoon dried sage leaves
1/2 teaspoon dried plantain leaves
1 cup boiling water

Directions: 

Pour water over herbs. Cover and steep for 15 minutes. Pour the liquid through a fine cloth or a coffee filter to strain. You can drink up to 3 cups daily. Sweeten the tea with honey, if desired.

Mullein Cough Drops

Ingredients:

½ cup mullein leaves, packed
1 cup boiling water
1 1/3 cup brown sugar 

Directions:

Cover leaves with boiling water and steep for one hour. Strain through a fine cloth or a coffee filter. Add brown sugar. Boil mixture until it reaches the soft candy stage and then pour onto a greased cookie sheet. With a knife, score out squares while the mixture is still soft. Cool completely and break into individual squares. Wrap each drop in waxed paper.


Notes: While the content of this blog has been tried/tested and the research diligently presented, I am not responsible for your use of it. Always try a little of the food first to test for allergies. Please do your own research. Discuss with your doctor before you use any herbal medications. 


Thursday, April 11, 2013

Eating Prickly Pear? Are you crazy?


You would not think that the Mid-South would be a mecca of cacti. It is odd to think of a cactus and the states of Tennessee and Georgia in the same thought. However, they do grow here. I personally have found them in Maury and Marshall counties and even near Centennial Park in downtown Nashville. What makes these desert plants grow here? Rock. Granite outcrops to be specific. This rocky terrain gets much hotter than the surrounding area as the rocks absorb heat. There is also less moisture as runoff occurs. Thus, you have a mini desert! So we have the luxury of plants that are ideally suited for these desert-like conditions which you would not find in this area otherwise. Prickly pear (Opuntia humifusa) cacti is also highly edible. Both the pads and the red fruit that the plant produces can be used in numerous recipes. This cactus has been a frequent ingredient in southwestern and Native American cuisine.

The best time to harvest the cactus paddles or "Nopales" is in the late spring while the fruit or "Tunas" is in the late summer. There are two types of spines on these pads that you must eliminate before cooking. You will see large smooth fixed spines and small hair-like spines that are called glochids. It is these glochids that will cause you the most pain! They easily penetrate the skin and detach from the plant. There are two ways to remove the glochids from the pads or fruit. You can either cut/scrape it off or you can burn it off. If a blow torch is not convenient, I would suggest the scraping. To harvest, use a knife (or twisting/bending motion) and tongs. I would also suggest using gloves, thick ones. You can actually buy the cacti in Spanish markets already de-spined and sliced, ready for cooking. So when you are cursing about the stickers in your hand, remember that people pay big bucks for this delicacy! Duct tape or Elmer's glue can be used to remove splinters.

The pads of the Prickly Pear have a taste similar to green beans and a texture like okra. The red fruit is slightly sweet and similar to a cross between a pear and a beet. The pads are typically boiled, grilled or fried while the fruit is often made into jelly, added to smoothies or eaten raw. The pads are not peeled. Just carefully remove the spines before slicing and cooking. For the fruit, if you cut the ends off and then cut in half or make a slice down the side of the body, the peel comes right off. You can also easily scoop out the seeds with a spoon. The flesh is the part in which most people are interested, though the seeds are edible as well. To juice the prickly pear fruit, place the "husked" (still with seeds) prickly pears into a blender or food processor and pulse until liquefied. Poor into a fine mesh sieve and press out the juice into a bowl. Discard the remaining seeds and pulp. Depending on the size, between six and twelve prickly pear fruits will give you one cup of juice.

Research on the nutrition of the prickly pear suggests that is can lower bad cholesterol and lower the need for insulin in diabetics. It has many antioxidant properties and is rich in vitamin C, iron, beta carotene and calcium. Due to its high fiber content it has also been used to improve the digestive system.

While a person who has never eaten prickly pear before might find the idea of eating something with spines on it to be a bit crazy, there are numerous accounts of people who grew up eating it, still crave it and reverently pass down recipes for it. Here are some recipes:

Cactus Fries

Ingredients:

1 large or two small pads of Prickly Pear Cactus
1 cup buttermilk
1 tablespoon flour
2 tablespoons baking powder
¼ lb cornstarch
1 tablespoon salt
2 tablespoons paprika
1 teaspoon white pepper
3 tablespoons garlic granules
1 tablespoon sugar

Oil for frying

Directions:

Clean and then cut cactus into fry shaped slice. Place in a colander and let drain for an hour. Place slices in a dish and coat with buttermilk. Put in refrigerator to soak overnight. The next day, drain most of the buttermilk. In a separate bowl, mix dry ingredients. Dip slices into dry mix to coat. Fry in oil in heated pan or electric deep fryer until crispy.


Prickly Pear Salsa

Ingredients:

3 large tomatoes, chopped
3 medium Golden Delicious apples, grated
1 medium red onion, chopped
2 cups diced cactus pads
2 zucchini, grated
Juice of 2 limes or lemons

Directions:

Toss all ingredients in a bowl and refrigerate until serving.  This produces about eight cups of salsa.


Cactus Casserole

Ingredients:

3/4 lb cactus paddles, cleaned and sliced thin
1 tbsp canola oil
1 yellow onion (diced)
3 cloves garlic (minced) 2 cups sour cream
2 tablespoons chili powder
1 tsp ground cumin
1/2 tsp oregano
1/4 tsp ground allspice
1/4 tsp cayenne
3 cups cooked rice
4 cups Monterrey Jack shredded cheese, divided
salt (to taste)

Directions:

Preheat oven to 350 degrees.

Boil sliced cactus in water for 15 minutes.  Drain and rinse under cold water.  Set aside

In a skillet, fry onion in oil until translucent, add garlic for one minute more.

In a large bowl, add all ingredients and half the cheese.  Mix well. 

Place mixture in casserole dish.  Top with remaining cheese. 

Bake for 30 minutes uncovered until cheese is bubbly and beginning to brown.


Prickly Pear Syrup

Ingredients:

6 cups prickly pear (fruit) juice
6 cups white sugar
4 tablespoons lemon juice

Directions: 

Combine strained prickly pear juice and lemon juice and cook over medium heat until boiling.  Add sugar and stir constantly.  Keep at a rolling boil until all of the sugar is dissolved. Remove pan from heat.  If canning syrup, ladle into sterilized jars and water bath can for 15 minutes.  If using syrup immediately, cool syrup and store covered in the refrigerator for up to one month.

This is great for mixed drinks, on pancakes or as a marinade for chicken when mixed with pineapple!


Prickly Pear Jelly

Ingredients:

4 cups prickly pear (fruit) juice
6 tablespoons lemon juice (freshly squeezed)
1 package no sugar pectin
4 cups sugar

Directions:

Combine prickly pear juice, lemon juice, and pectin in a large sauce pan. Bring to a hard boil. (A hard boil is when the pot continues to boil, even after you've stirred it).  Begin to add sugar slowly with constant stirring, taking about 5 minutes to add sugar, and keeping juice at a boil. 

Remove from heat and ladle into hot sterilized jars, leaving 1/4 inch of head space. Wipe rims thoroughly. Center hot lid on jar. Apply band and adjust until fit is fingertip tight. Water bath can for 15 minutes.

Optional: 1/4 cup jalapeno peppers diced fine added along with sugar


Monday, April 1, 2013

The Lowly Wild Onion

Wild onions (Allium species) are some of the first plants to pop up in middle Tennessee.  This year their bright green tufts began poking their heads up at the end of January.  Tennessee has wildly fluctuating weather.  One winter day can be near 70 degrees while the next day is 30 degrees with an ice storm.  Some years you have more near 70 degree weather than others and the poor confused plants start blooming early.  I actually used this to my advantage when I brought my soon to be husband home to visit my family at Christmas one year and it was barely sweater weather.  It convinced him to move here from Florida! 

Family in the 1960's
One of the few wild plants with which my family has a history is the wild onion.  My grandparents were from Denmark arriving in the United States in the 1950's with their growing family.  My grandfather was an engineer working for the government and my grandmother had worked as a midwife and nursing assistant before leaving Denmark.  By the 1960's they had four children and they divorced.  My grandfather traveled to foreign countries on long assignments for his job so he was not around.  My grandmother, who probably did not have the right credentials to continue her career in the United States nor a strong enough grasp of English, was only able to work low paying jobs. So here she was in the United States with no family support system, four children to raise and limited financial resources.  To put it bluntly, they were poor and struggling.  So poor that my mother would tell me stories about drinking Pepsi and picking and eating the wild onions on crackers for food. Not exactly complete nutrition but if you are starving, you take what you can get.  So the wild onion is a personal favorite of mine.

The main rules for onion hunting are if it smells and looks like an onion, it is an onion, and do not harvest along a roadside, industrial area, or yards that have been sprayed with pesticides.  There is a resemblance to a mildly toxic plant called Crow's Poison (Northoscordum bivalve) but it does not have an onion smell when crushed.  You would have to eat a pound of Crow's Poison to get a stomach ache.  Another look-alike is Death Camas (Toxicoscordion venenosum) and is poisonous but does not smell like onion.  It is usually found out West not in the South. Also, all onions are toxic to dogs and cats so do not feed it to them.  Onion hunters tend to find a favorite patch, often not revealing the location, and return to it to gather their onions year after year.

There are two common types of onions that you will most likely find, wild garlic (Allium vineale) and wild onion (Allium canadense).  Often you will not be able to tell them apart.  They both have long narrow leaves arising from basal bulbs. However, wild garlic has hollow and round leaves while wild onion's leaves are flat and solid.  The more common of the two is wild garlic.  All wild onions and wild garlic are edible.  They will never grow bulbs the size of store-bought onions as it is not in their genetics.  Their bulbs will be more like pearl onions.  The leaves are skinnier than the green onions that are sold in the store, and have a stronger oniony taste. They actually look more like chives. Cooking the onions mellows the flavor out.  You can replace wild onions in any recipes that call for green onions or chives.

It is common in some parts of the south and west for churches to have wild onion lunches for fund raising in the springtime.  They are typically served sauteed with scrambled eggs.  As far as nutrition goes, wild garlic and onions contain vitamin C, A and potassium.  Native Americans ate wild onions as a cure for colds.  They also rubbed the plant on their bodies to protect them from insects.  In modern times, onions have been reported to lower blood pressure, help to facilitate detoxification, act as powerful antioxidants, stimulate immune responses and reduce inflammation.

Wild onions/garlic can also be dehydrated and used for later purposes.  However, if doing it indoors, it will make your house smell like onions for days.

Here are some recipes to try:

Eggs and Bacon with Wild Onion

Ingredients:

6 slices of bacon, diced
1 cup wild onion, chopped
10 large eggs
1/4 cup milk
1 teaspoon salt
1/2 teaspoon pepper
1 cup shredded cheddar cheese

Directions:

In a medium bowl, whisk together the eggs and milk and season with salt and pepper.  Set aside.

In a hot pan, fry the bacon until nearly crisp.  Add onions and fry until bacon is crisp.  Add the egg mixture and cook, stirring until set, about 4 minutes.  Cook until desired egg texture is achieved. Sprinkle with cheddar cheese before serving.

Serve with hot sauce.


Wild Onion and Oyster Chowder

Ingredients:

4 cups cubed frozen hashbrowns or 4 cups cubed potatoes
2 ribs celery, diced fine
1/2 cup wild onions, chopped
1 garlic clove finely minced or pressed
1 tablespoon butter
4 tablespoons flour
2 cups milk
2 cups half and half
1 teaspoon chicken bouillon granule
fresh coarse ground black pepper, to taste
2 (3 3/4 ounce) cans petite smoked oysters, drained
6 slices of bacon cooked crisp and crumbled
oyster crackers 

Directions:

Microwave or boil potatoes until tender. Drain.

In a large pot, saute wild onions, celery and garlic with butter. Add potatoes and flour, blend well.

Add half and half, milk, bouillon, pepper, and oysters.  Cook until heated through, gently stirring occasionally.

Serve topped with bacon and oyster crackers.

Variation option:  Add 1 can drained corn


Notes: While the content of this blog has been tried/tested and the research diligently presented, I am not responsible for your use of it. Always try a little of the food first to test for allergies. Please do your own research. Discuss with your doctor before you use any herbal medications.